So you’re ready to send through some work to be designed…but how do you go about supplying things…see below for some handy hints.
You’re in the UK, but I’m in a different country can you still do the work?
Yes, I’d be happy to oblige.
What files do I need to supply?
I’m able to work with the stand files that you’re used to using, however it is best to supply editable files where possible:
- Microsoft Office (Word, Excel, Powerpoint)
- Adobe Photoshop (PSD files, we also use to handle TIFF, JPEG, EPS (bitmap), GIF and PNG
- Adobe Illustrator (AI and EPS (vector) files) – include all embedded images and convert all text to curves.
- Adobe InDesign (include both indd and idml files) – include all images and fonts (if you’re unsure how to do this – Indesign has a Package function that does it all for you!)
- Please note that Adobe Packages are currently run on the Adobe Cloud setup and use the most recent update that’s available.
Please note that all work will be done on Apple Mac – this shouldn’t cause too much of an issue but please take into account the type and font you wish to use.
What size?
Normally you’ll have an idea of the size of paper you require your design to be done to, be it leaflet, postcard or poster size.
The following guide will help you decide as to which is best to use.
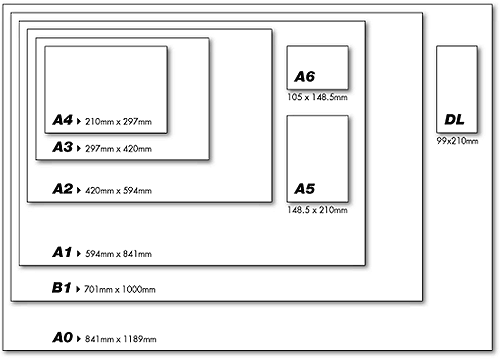
Leaflets/flyers are normally done either A4, A5 or DL and a postcard is known as an ‘A6’ Posters tend to be A4, A3, A2, A1
Please note that UK and US use slightly different paper size..for example in the UK we’ll use ‘A4’ as our standard printer paper, however in the US the size used is ‘legal’!
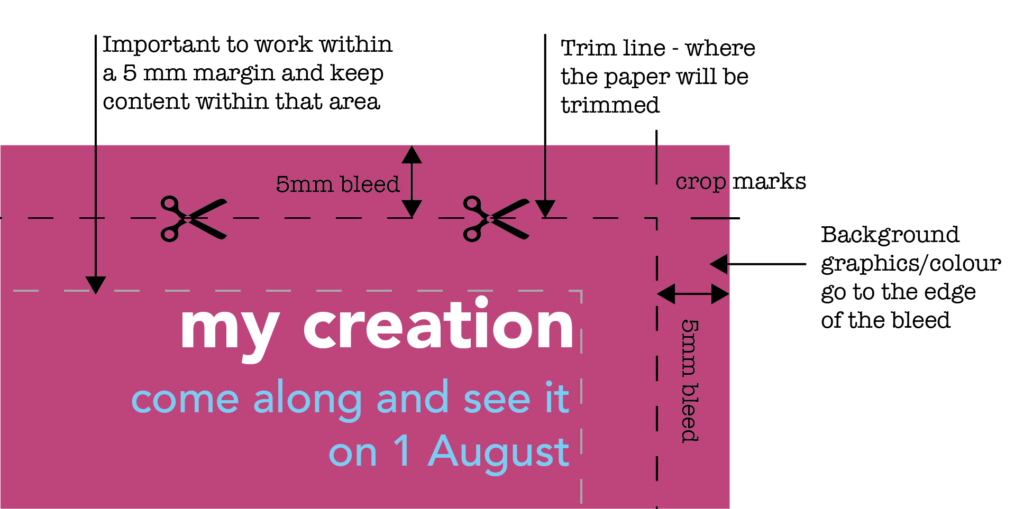
Do I need to take it the page edge?
Normally when you print a standard size page with elements on it that extend right up to the edge, the printer stops short of the edge, cuts the elements off and leaves an unprinted strip – the white frame.
If the print should fall off the edges, the technique used is BLEED and it will ensure that your final document retains a professional look without unsightly white strips left behind and if you are planning to print to an external printer, it is best that bleed included.
This graphic below will help as a guide:
Keep the image sharp!
Try to send your images through at at a resolution of 300dpi at the finished size. It is best to create new files at their finished size and set the 300dpi at this stage rather than trying to change it later as sometimes the picture will lose it sharpness.
Colour
Try to keep the use of colour to a minimum – yes it’s nice to standout but stop and think a moment do you want to attract or detract! Also consider those with visual needs.
Image files are usually in the ‘RGB’ colour model – but be aware that external printers works in CMYK – even if you have access to a laser printer that can print CMYK – and therefore a conversion takes place and you may notice it looks different to your screen image.
RGB has a much larger ‘gamut’ (range) of colours, many can’t be produced from CMYK, so the printer picks the nearest in range.
Often this will mean you colours are not how you expect, however if your software will convert to CMYK, you will get a far better idea of how the final print will look.
If colour is of particular importance, I advise obtaining an initial ‘proof’ print from you printer.
How do I supply my files to you?
You can either supply the files by email – just be careful of you email provider or business mailbox size limits; you may find that by zipping the file up get round this!
Or if it’s easier why not up load to dropbox or similar account and email me the link to download them.
The devil’s in the proofing!
All proofs will be supplied by a low res proof file which is suitable for printing only on an office printer and is not for large scale print runs.
Please ensure that you check these carefully as any slips/mistakes may have already originated in the files already supplied.
If you need something changing, pdf markup them and email back the markup pdf.
Sometimes if a load of changes are needed it is actually quicker to amend the original file supplied that you supplied.
I’m a happy with the final proof…what’s next?
Once you are happy with the final proof then suitable copies will be supplied for you to:
- Print at an external printers – please ensure that you have contacted them as to your requirements as the final file I supply to you will need to be set in their requirements.
- Use on digital screen systems – this will usually be png or jpg
- e-book pdf format – this will be a pdf that will be slightly better quality than then low res version, but small enough to open on a mobile devide.
Anything else you need to ask but is not mentioned? Drop an email with it and I’ll get back to you…it may appear here as a future handy hint!